July 31, 2013

Pick of the Month: July // Summer Wedding

1. Pink Baby Scalloped Edge Cardigan from Monsoon / 2. White Saltwater Sandals from SunSandals / 3. Pink Martina Satin Clutch Bag from John Lewis / 4. Sugar me up Holdall by Roxy from Surfdome/ 5. Pink Maddy Disc Hat from John Lewis / 6. Pink Flower Bud Bando from Monsoon / 7. White Baby Sara Striped Dress from Monsoon / 8. Forever Together Charm from Pandora/ 9. Pink Easy Grip Beaker from Nuby.

This July my little girl and I are prepping up for a summer wedding in Switzerland! We are going for a pink-ish theme here, mainly due to me recycling a dress I wore many years ago (and that miraculously still fit!). The dress code requires wearing a hat, and there is no way I can convince Olivia to wear one, so I'm opting for a flower bando, hoping that she won't realise she's actually wearing one!
Loving that Roxy bag, it would be perfect to keep nappies, wipes, clothes change, that colour matching beaker and all the other million things a child needs when out and about, and that I will have to bring to the wedding. Only a few days to go now!

July 29, 2013

30/52

Still enjoying the summer and this project! Lots of playing, laughing, blabbering and indoor picnics this week. And also getting ready for our holiday.

This week you:
  • Had fun playing with our old matress. We fold it in two and you loved walking in the middle of it, sliding the sides, and jump on it.
  • Waved mama goodbye and sent kisses when I dropped you off at nursery.
  • Enjoyed the good weather with trips to the playground after dinner.
  • Talked way too much, and really you are becoming such an entertainer we could spend hours just watching you doing your own things.
  • Shouted 'papa wake up!' one morning, or this is what we think you said. But you repeated it twice, we both heard it, so that counts!
  • Watched more children videos that normally allowed, but we all had a rough time and that helped us recover and eased our way through the week.
  • Spent an entire day without a nap for the first time and didn't seem to mind. But we were nackered and put you to bed at 7.30pm.
  • Said the name of your favourite toy ('nanna') for the first time. And you had to say it a couple of times before I realised that you were actually saying a new word. We are getting so used to listening to you talking!
And a lot of summer splashes in last week's portraits from  Forever Lovely. It makes me miss the beach even more!
If you are curious about this project and want to know more, you can check Jody's blog @ Che and Fidel.
All my previous posts can be found here.

July 26, 2013

The Phone Photography Project // Part 3

Made it to the third week of this phoneography project and discovered that it is really worth taking a greater care when taking pictures with your phone. I got used to the idea that phone pictures are on-the-go pictures, the ones you take for quickly snapping some on-the-moment events, without caring about the light, the background noise, the composition. It is all of that for sure, but also a lot more. Phone pictures are not less valuable than those taken with your big camera, and a good shot is always a good one regardless which device you are using. Phone pictures are the ones you are more likely to share with family and friends and the ones that you will look at more often, especially if you, like me, only delete pictures from your phone twice a year. Not in a million year I'm planning to become a professional photographer, although that was one of my dream at some point in my life, but surely it wouldn't hurt having a good collections of pictures to document our life.

Day 17: Far Away
"Everything seems simpler from a distance."
Gail Tsukiyama

Day 18: Reflection
"There is only you and your camera. The limitations in your photography are in yourself, for what we see is what we are." Ernst Haas


Day 19: Shadows

"Where there is much light, the shadow is deep."
Johann von Goethe

Day 20: In Season
"In summer, the song sings itself." 
William Carlos Williams


Day 21: What's Cooking
"Food is an important part of a balanced diet."
Fran Lebowitz

Day 22: Routine
"Summer afternoon-summer afternoon; to me those have always 
been the two most beautiful words in the English language."
Henry James


Day 23: Laughter
I don't trust anyone who doesn't laugh."
Maya Angelou


Day 24: Bloom and Grow
"The greatest gift of the garden is the restoration of the five senses."
Hanna Rion

Click on the icon on the right side bar, under the ‘my projects’ section, or just click here to check all my previous #walktowork posts.
I am also posting my pictures daily in Instagram using the #BPCphonephotographyproject tag (click here to follow).

July 24, 2013

Moleskine Reloaded


I can honestly say that I’m pretty obsessed with sketchbooks. As it stands I have about 8 of them going at the same time, and as I said before this year (or was last year?!?), my resolution is to complete all of them before buying a new one. But that has proved to be very hard, both the not-buying part and the completing-them-all part. So to satisfy my craving, without compromising my intentions, I decided to make a new sketchbook using an old moleskine diary.

I have made sketchbooks before, and I love how they look once they are finished. And I noticed I have different feelings when using a homemade item, than when I use something I bought brand new.
I don’t feel the pressure of having to make things look perfect, to follow a certain style, to make no mistakes. If I have made the item once, I can sure make it again and that somehow gives me the freedom to experiment a bit more and put the pressure off. And I believe this is the reason why my homemade sketchbooks look nicer and more cohesive than the once I normally buy.
Another good reason for making my own sketchbook is that I can choose the style, the format and the paper that goes in it. To be fair, I have loved the moleskine watercolour books since they came out, and that is what I use the most. However, the sizes available are not my ideal choice.
I love the pocket size of the moleskine, as it goes well with my pocket size watercolour kit, which is just perfect for outdoor and travel sketching. But the landscape format sometimes has proven not to be ideal. I feel like it is too narrow for some subjects, and to make up for it I normally carry some spare watercolour sheets in a different size.
To cut this short, I used an old moleskine daily planner and re-filled it with watercolour paper (I used Fabriano Accademia, natural grain, 240g/m// 113lbs), giving me a 48-pages pocket size sketchbook in a portrait format. I have followed the very detailed instructions found on the Trumpetvine Travels website. They are absolutely well written and so easy to follow.


The sketchbook came out pretty well; it is not perfect, I didn’t trim the edges of the pages, so they don’t align perfectly and, although I rounded the edges to match the moleskine cover, somehow I managed to trim some of the side edges of each sheet as well (I’m still mastering the art of corners rounding!).

But I absolutely love the overall look. I promised myself not to start using it until I finish at least my two moleskine sketchbooks, which fortunately have only few pages to go.


Shop news :: As I tend to get carried away with repurposing old moleskine diaries, the above pocket size moleskine reloaded is now available to buy on my Etsy shop (click here).

July 23, 2013

The Phone Photography Project // Part 2

And this is part 2 of the Phone Photography Project at Big Picture Classes. The challenges keep coming in every day; sometimes I manage to shoot the right picture straight away, some other times I wait for a better opportunity. And this week has been a bit of a catch up exercise.

Day 9: Jump
"Look, I really don't want to wax philosophic, but I will say that if you're alive, you got to flap your arms and legs, you got to jump around a lot, you got to make a lot of noise, because life is the very opposite of death." Mel Brooks

Day 10: Clouds
"Clouds come floating into my life, no longer to carry rain or usher storm, but to add color to my sunset sky." Rabindranath Tagore

Day 11: Change Your Perspective
"While there is perhaps a province in which the photograph can tell us nothing more than what we see with our own eyes, there is another in which it proves to us how little our eyes permit us to see." 
Dorothea Lange

Day 12: At Play
"A little nonsense, now and then, is cherished by the wisest men."
Roald Dahl

Day 13: Water
"If there is magic on this planet, it is contained in water."
Loran Eisely

Day 14: On the Street
"To me, photography is an art of observation. It's about finding something interesting in an ordinary place I've found it has little to do with the things you see and everything to do with the way you see them."  Elliott Erwitt

Day 15: Summer Selfie
"There is just one life for each of us: our own." 
Euripedes

Day 16: Up Close and Personal
"Look closely. The beautiful may be small." 
Immanuel Kant

The picture for Day 9 was taken with PhotoSequencePro for Android using a Nexus 4. 
All the other pictures are taken with an Iphone 4S, using the phone default camera.
Filters are all Instagram.
Click on the icon on the right side bar, under the ‘my projects’ section, or just click here to check all my previous #BPCphonephotographyproject posts.
I am also posting my pictures daily in Instagram using the #BPCphonephotographyproject tag (click here to follow).

July 22, 2013

29/52

Summer is quickly sleeping away, but we are trying to make the most of it. Trips to the park, outdoor playing, BBQs. And eagerly waiting for our summer holiday in a couple of weeks.
One of your favourite at the playground
This week you:
  • Wore your first pigtails. And you were very patient while I struggled to tie your hair!
  • Had fun at our friends' house on Sunday. But didn't played much with the other kids, I guess they were too old for you. And fell in love with an outdoor circus tent.
  • Played in the nursery playground before going in in the morning and before going home in the afternoon. Favourite toys, the police car and the kitchen units. And then we had to race to the door.
  • Ate a lot. And drank a lot of milk. And we love it when you are so good!
  • Went swimming with mama on Saturday. But all you wanted to do was staying under the shower in the changing room! And you didn't like it much either when the other kids were splashing water at you.
  • Loved our trip to Ikea. You seriously tested all the chairs and beds in the store. And asked for chicken, chips and peas for lunch :)
  • Enjoyed reading out loud one of the books we picked up from the library, 'Spot loves sports'. And we secretely laugh every time we hear you making noises and animal sounds.
  • Learned to repeat after papa: 'BA', 'BE', 'BI', 'BO', 'BU'. And you impressed all your grandparents with this!
And from last week I'm loving Advay from The Art Side and his personal art gallery! Beautiful watercolours. 
If you are curious about this project and want to know more, you can check Jody's blog @ Che and Fidel.
All my previous posts can be found here.


July 19, 2013

Envelope book tutorial (sort of!)

The idea of making an envelope book came up after finding a nice letter writing set at our local car boot sale. I truly cannot remember on which blog I saw an envelope book for the first time. It wasn’t long ago, and I have been looking over the internet for a good couple of days, but couldn’t find it again. Anyway, I decided to gather a few tutorials from different places, but ended up making my own version based on what I had available.
My starting point was of course the letter writing set, which included envelopes and correspondence cards all in light salmon/coral. 
I decided to go for a green/salmon colour combination and rummaged through my stash for some matching patterned paper, washi tape and fabric.
There was some trial and error along the way, and had to repeat some steps a few times before I was happy with the results. So hopefully, this tutorial will help you avoid those mistakes and save on time and supplies.

//This is what you need//

**tools**
  • Scissors
  • Fabric glue
  • Double sided tape – 50mm for big surfaces, 12mm for smaller areas.
  • Rotary cutter
  • Cutting mat
  • Ruler

**supplies**
  • 10 A6 envelopes
  • 5 A6 correspondence cards
  • 5 A6 patterned paper
  • 13mm Washi tape
  • 2 pieces of patterned fabric – approx. 175x130 mm each
  • 1 piece of matching fabric – 70x152mm
  • 2 A6 sheets of cardboard
  • 2 A6 (or slightly smaller) sheets of cardstock
  • 2 pieces of satin ribbon – approx. 15cm each
I hope that the pictures will help clarify the instructions below.

//This is what you do//

To put together the inner pages::

1. Bind all the envelopes together using washi tape and trimming the excess. I positioned the envelopes so that on each spread I would end up with one back and one front side. 
 
2. Cover the spine of the envelope book with more washi tape, to keep everything in place. 
 
3. Add some matching washi tape to each of the plain correspondence cards. I put some on both sides and then trimmed the excess. 
4. Fill each envelope with correspondence cards and patterned paper, alternatively. 
 

To create front and back covers::
5. Glue the cardstock on the inner side of your chosen cover fabric, making sure it is roughly centred (I used one big piece of fabric, glued the two cardstocks and then cut it in half later using a rotary cutter).
6. Cut the four corners Fold the corners (I learned this when it was already too late!), then fold the edges and glue them onto the cardstock (you can use double sided tape if it is easier). 
7. Place one piece of satin ribbon on the long inner side of the cover, roughly in the centre (about 2cm in). You can use some double sided tape to keep it in place.

8. Lay the inner side of your cardboard sheet with double sided tape (I used the 50mm one) and gently place it on the inner side of the cover making sure it is somewhat centred. Now press. 
9. Repeat steps 5-8 to make the other cover.

To put things together::

     10. Attach the front cover to the first envelope using some washi tape (the same way you attached each envelope to one another). Repeat the same process to attach the back cover. 
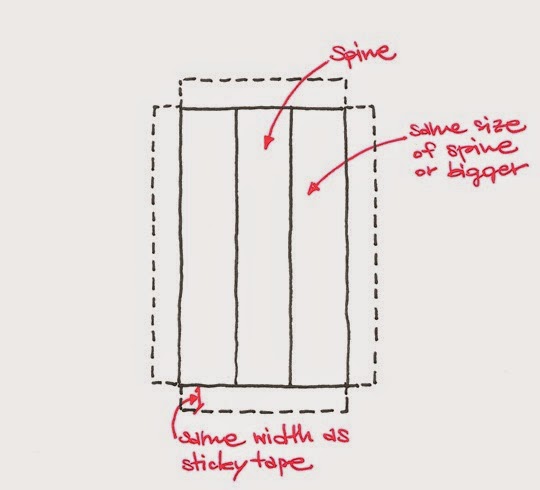
11. Measure the width and height of the spine. Cut a piece of fabric as shown in the picture below. This will need to cover the central spine and some of the front and back covers. For example, mine is approximately 1.5cm(back)+1.2cm(spine)+1.5cm(front). Remember to cut it a bit longer than the height of the book and a bit wider than the spine plus the front and back. I added about 1.2cm all around, which is the same width of my small double sided tape roll. 
12. Lay the sticky tape on the extra fabric and fold it onto the inner side. Now the edges are secured and won’t fray. 


      13. Cover the back of your fabric, edge to edge, with the wider double sided tape.
 
14. Adhere to the edges of the covers. I used bulldog clips to keep the covers and inner pages together while attaching the spine cover. 
And you are done!
 
 
Of course there may be better and easier ways to do this, but this is what worked for me.
I am planning on using my envelope book for collecting ephemera and writing quotes. But there are so many uses to it; storing photos, receipts, thoughts, and so on.
 
NOTE: As I ended up making two extra envelope books, these are now for sale in my Etsy shop.
Related Posts Plugin for WordPress, Blogger...