I used a small wicker wreath as a base, about 25cm, and covered it with a burnt orange wool yarn. I then sew some felted ball in various colours, but you can easily use a glue gun. I didn't really follow a pattern, just made decisions on colour and position as I sew along. I then made a hook on the top using some matching yarn and did a little testing, to see where it would sit best on our door. But for the time being is hanging in our living room, out of reach from my little who’s obsessed with felted balls!
Showing posts with label DIY. Show all posts
October 30, 2013
Autumn wreath
October 23, 2013
DIY Rubber stamps
A few weeks ago I came across a beautiful and captivating book on rubber stamps. The front cover was enough to make me buy it, and after flicking through the pages I was totally hooked. The book is Geninne D. Zlatkis "Making an impression", and it's about making your own rubber stamps, with lots of tutorials, ideas, templates and so on. She gets inspiration from nature and translate her interpretation of it into beautiful stamps.
The process of rubber carving is quite straightforward, as long as the design is simple and not too intricate. There are many tools and materials available, of higher quality and more professional than the ones I used, but as I didn't want to wait, I just used what I had handy.
This is what I used to carve my own stamps.
The first thing I did, was to ink the eraser surface, let it dry for a few minutes, gently wash it with water and let it dry again. This preparation process will become handy when cutting the design.

Using the craft knife, I marked the outline of my design and with the retractable knife I started cutting deeper and taking out the rubber around the picture. This is the most delicate part of the entire process; the more careful you are, the better your rubber stamp will be, especially if you are dealing with round surfaces. The coloured surface of the rubber will help showing the cuts. Now, the best way of doing this would be to use a lino cutter tool, if you have one.
You can try out your stamps during the cutting process, to see whether you need to cut more or make adjustment.
Once you are happy with the results, just ink it and start stamping. I'm telling you, it's addictive...I'm stamping everywhere!
This is what I used to carve my own stamps.
- small cutting mat
- some scrap paper to try out my designs
- HB pencil
- craft knife ( I used a Jakar swivel knife)
- retractable knife
- Some plastic erasers
- ink pads in various colours
While the eraser surface was drying up, I tried various designs on a piece of scrap paper, bearing in mind the size of my plastic erasers. Once I was happy with the design, I copied it onto the eraser's surface. This is the easiest way of trasferring your picture. For more complicated ones, I would suggest using tracing paper.
You can try out your stamps during the cutting process, to see whether you need to cut more or make adjustment.
July 19, 2013
Envelope book tutorial (sort of!)
The idea of making an envelope book came up after finding a nice letter writing set at our local car boot sale. I truly cannot remember on which blog I saw an envelope book for the first time. It wasn’t long ago, and I have been looking over the internet for a good couple of days, but couldn’t find it again. Anyway, I decided to gather a few tutorials from different places, but ended up making my own version based on what I had available.
My starting point was of course the letter writing set, which included envelopes and correspondence cards all in light salmon/coral.
I decided to go for a green/salmon colour combination and rummaged through my stash for some matching patterned paper, washi tape and fabric.
There was some trial and error along the way, and had to repeat some steps a few times before I was happy with the results. So hopefully, this tutorial will help you avoid those mistakes and save on time and supplies.
//This is what you need//
**tools**
- Scissors
- Fabric glue
- Double sided tape – 50mm for big surfaces, 12mm for smaller areas.
- Rotary cutter
- Cutting mat
- Ruler
**supplies**
- 10 A6 envelopes
- 5 A6 correspondence cards
- 5 A6 patterned paper
- 13mm Washi tape
- 2 pieces of patterned fabric – approx. 175x130 mm each
- 1 piece of matching fabric – 70x152mm
- 2 A6 sheets of cardboard
- 2 A6 (or slightly smaller) sheets of cardstock
- 2 pieces of satin ribbon – approx. 15cm each
I hope that the pictures will help clarify the instructions below.
//This is what you do//
To put together the inner pages::
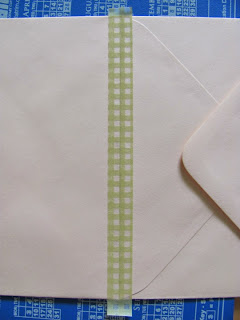
1. Bind all the envelopes together using washi tape and trimming the excess. I positioned the envelopes so that on each spread I would end up with one back and one front side.
To create front and back covers::
5. Glue the cardstock on the inner side of your chosen cover fabric, making sure it is roughly centred (I used one big piece of fabric, glued the two cardstocks and then cut it in half later using a rotary cutter).
6. Cut the four corners Fold the corners (I learned this when it was already too late!), then fold the edges and glue them onto the cardstock (you can use double sided tape if it is easier).
7. Place one piece of satin ribbon on the long inner side of the cover, roughly in the centre (about 2cm in). You can use some double sided tape to keep it in place.
8. Lay the inner side of your cardboard sheet with double sided tape (I used the 50mm one) and gently place it on the inner side of the cover making sure it is somewhat centred. Now press.
9. Repeat steps 5-8 to make the other cover.
To put things together::
10. Attach the front cover to the first envelope using some washi tape (the same way you attached each envelope to one another). Repeat the same process to attach the back cover.
11. Measure the width and height of the spine. Cut a piece of fabric as shown in the picture below. This will need to cover the central spine and some of the front and back covers. For example, mine is approximately 1.5cm(back)+1.2cm(spine)+1.5cm(front). Remember to cut it a bit longer than the height of the book and a bit wider than the spine plus the front and back. I added about 1.2cm all around, which is the same width of my small double sided tape roll.
12. Lay the sticky tape on the extra fabric and fold it onto the inner side. Now the edges are secured and won’t fray.

13. Cover the back of your fabric, edge to edge, with the wider double sided tape.
And you are done!
I am planning on using my envelope book for collecting ephemera and writing quotes. But there are so many uses to it; storing photos, receipts, thoughts, and so on.
NOTE: As I ended up making two extra envelope books, these are now for sale in my Etsy shop.
June 19, 2013
5" x 5" series
It all started a few months ago, on a day I was feeling not so positive and needed to boost up my mood. I had paper with me and a red highlighter. I started to draw squares and to write and draw stuff in them. And so it began, my 5”x5” series. I started to experiment with different types of paper; watercolour, Bristol, ruled and cartridge, and different pen and pencils; highlighters, markers, fine liners, watercolours. And I liked the idea of building up a portfolio. I started to search online for the perfect folder, but I couldn’t find anything I liked. The size of the cards is actually the same of a CD player, but the sleeves mostly available are those with a paper backing and a v cut on the front; and really don’t like those. So I ended up buying a bunch of plastic sleeves with flaps and hole punches, and to keep them together I made my own cover. I used two thick cardboards and cut them slightly bigger than the cards. I then used some scrap fabric which I glued on the two cards and some heavy gold paper to finish the inside. I covered the fabric with a thin coat of clear gesso and, once dried, I used a black permanent marker to write on it. I didn’t like how the back cover had turned out, so I had to make some adjustments. I painted the back with some red acrylics, waited for it to dry and then wrote on it again. I then hole punched the two covers and used two ring binders to hold everything together. I love it!
Front and back covers
Red fineliner 0.5 on bristol paper and watercolour on watercolour paper
Red highlighter and black permanent marker on ruled paper
Blue higlighter on 4" blank paper
Red fineliner 0.5 on bristol paper (5"x3")
Lino cut ink print
I am having so much fun drawing/writing in these 5" squares that I am planning to experiment a lot more with these and to expand the collection. And also thinking of framing some of these cards using a square black or white frame.
Subscribe to:
Posts (Atom)