Showing posts with label etsy. Show all posts

January 15, 2014

Shop update // Clearance Sale 50% OFF

One of the intentions of my One Little Word for 2014 is to focus on just a few things, in the hope that my creative spirit will have the chance to soar. On the practical side, I'm working on quite a lot of things to achieve this. Starting from my Etsy shop. In 2014 I will be focusing on selling items that reflect my creativity and hopefully will show a common style between them. I haven't set out a clear plan yet, but I know for sure the type of items currently on sale that I want to keep in the shop:
The rest is currently on sale at 50% OFF!! the clearance section also inlcude some Christmas items that didn't sell, so if you are stocking up for the end of the year holiday, have a look.
I'm hoping to get a new banner and to add more items soon.

October 04, 2013

A new illustration

I have been obsessed with hot pressed paper lately. And with some illustrations sketches I've been working on. I'm still experimenting with large washes, but love the added texture, particularly to the clouds.
The illustration is available on my Etsy shop.

August 30, 2013

The House Garden

Just finished this House Garden illustration inspired by one of my mum's kitchen towel from her dowry. I decided to use Arches hot pressed paper, and although is not my favourite brand, I think it was perfect for this subject. And I'm already planning to make some more on a similar style.
The original painting will be up on sale on my Esty shop sometime this weekend. 
Happy weekend to all!

July 24, 2013

Moleskine Reloaded


I can honestly say that I’m pretty obsessed with sketchbooks. As it stands I have about 8 of them going at the same time, and as I said before this year (or was last year?!?), my resolution is to complete all of them before buying a new one. But that has proved to be very hard, both the not-buying part and the completing-them-all part. So to satisfy my craving, without compromising my intentions, I decided to make a new sketchbook using an old moleskine diary.

I have made sketchbooks before, and I love how they look once they are finished. And I noticed I have different feelings when using a homemade item, than when I use something I bought brand new.
I don’t feel the pressure of having to make things look perfect, to follow a certain style, to make no mistakes. If I have made the item once, I can sure make it again and that somehow gives me the freedom to experiment a bit more and put the pressure off. And I believe this is the reason why my homemade sketchbooks look nicer and more cohesive than the once I normally buy.
Another good reason for making my own sketchbook is that I can choose the style, the format and the paper that goes in it. To be fair, I have loved the moleskine watercolour books since they came out, and that is what I use the most. However, the sizes available are not my ideal choice.
I love the pocket size of the moleskine, as it goes well with my pocket size watercolour kit, which is just perfect for outdoor and travel sketching. But the landscape format sometimes has proven not to be ideal. I feel like it is too narrow for some subjects, and to make up for it I normally carry some spare watercolour sheets in a different size.
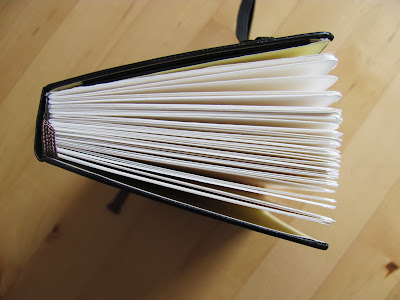
To cut this short, I used an old moleskine daily planner and re-filled it with watercolour paper (I used Fabriano Accademia, natural grain, 240g/m// 113lbs), giving me a 48-pages pocket size sketchbook in a portrait format. I have followed the very detailed instructions found on the Trumpetvine Travels website. They are absolutely well written and so easy to follow.


The sketchbook came out pretty well; it is not perfect, I didn’t trim the edges of the pages, so they don’t align perfectly and, although I rounded the edges to match the moleskine cover, somehow I managed to trim some of the side edges of each sheet as well (I’m still mastering the art of corners rounding!).

But I absolutely love the overall look. I promised myself not to start using it until I finish at least my two moleskine sketchbooks, which fortunately have only few pages to go.


Shop news :: As I tend to get carried away with repurposing old moleskine diaries, the above pocket size moleskine reloaded is now available to buy on my Etsy shop (click here).

July 19, 2013

Envelope book tutorial (sort of!)

The idea of making an envelope book came up after finding a nice letter writing set at our local car boot sale. I truly cannot remember on which blog I saw an envelope book for the first time. It wasn’t long ago, and I have been looking over the internet for a good couple of days, but couldn’t find it again. Anyway, I decided to gather a few tutorials from different places, but ended up making my own version based on what I had available.
My starting point was of course the letter writing set, which included envelopes and correspondence cards all in light salmon/coral. 
I decided to go for a green/salmon colour combination and rummaged through my stash for some matching patterned paper, washi tape and fabric.
There was some trial and error along the way, and had to repeat some steps a few times before I was happy with the results. So hopefully, this tutorial will help you avoid those mistakes and save on time and supplies.

//This is what you need//

**tools**
  • Scissors
  • Fabric glue
  • Double sided tape – 50mm for big surfaces, 12mm for smaller areas.
  • Rotary cutter
  • Cutting mat
  • Ruler

**supplies**
  • 10 A6 envelopes
  • 5 A6 correspondence cards
  • 5 A6 patterned paper
  • 13mm Washi tape
  • 2 pieces of patterned fabric – approx. 175x130 mm each
  • 1 piece of matching fabric – 70x152mm
  • 2 A6 sheets of cardboard
  • 2 A6 (or slightly smaller) sheets of cardstock
  • 2 pieces of satin ribbon – approx. 15cm each
I hope that the pictures will help clarify the instructions below.

//This is what you do//

To put together the inner pages::

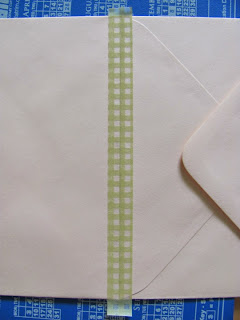
1. Bind all the envelopes together using washi tape and trimming the excess. I positioned the envelopes so that on each spread I would end up with one back and one front side. 
 
2. Cover the spine of the envelope book with more washi tape, to keep everything in place. 
 
3. Add some matching washi tape to each of the plain correspondence cards. I put some on both sides and then trimmed the excess. 
4. Fill each envelope with correspondence cards and patterned paper, alternatively. 
 

To create front and back covers::
5. Glue the cardstock on the inner side of your chosen cover fabric, making sure it is roughly centred (I used one big piece of fabric, glued the two cardstocks and then cut it in half later using a rotary cutter).
6. Cut the four corners Fold the corners (I learned this when it was already too late!), then fold the edges and glue them onto the cardstock (you can use double sided tape if it is easier). 
7. Place one piece of satin ribbon on the long inner side of the cover, roughly in the centre (about 2cm in). You can use some double sided tape to keep it in place.

8. Lay the inner side of your cardboard sheet with double sided tape (I used the 50mm one) and gently place it on the inner side of the cover making sure it is somewhat centred. Now press. 
9. Repeat steps 5-8 to make the other cover.

To put things together::

     10. Attach the front cover to the first envelope using some washi tape (the same way you attached each envelope to one another). Repeat the same process to attach the back cover. 
11. Measure the width and height of the spine. Cut a piece of fabric as shown in the picture below. This will need to cover the central spine and some of the front and back covers. For example, mine is approximately 1.5cm(back)+1.2cm(spine)+1.5cm(front). Remember to cut it a bit longer than the height of the book and a bit wider than the spine plus the front and back. I added about 1.2cm all around, which is the same width of my small double sided tape roll. 
12. Lay the sticky tape on the extra fabric and fold it onto the inner side. Now the edges are secured and won’t fray. 


      13. Cover the back of your fabric, edge to edge, with the wider double sided tape.
 
14. Adhere to the edges of the covers. I used bulldog clips to keep the covers and inner pages together while attaching the spine cover. 
And you are done!
 
 
Of course there may be better and easier ways to do this, but this is what worked for me.
I am planning on using my envelope book for collecting ephemera and writing quotes. But there are so many uses to it; storing photos, receipts, thoughts, and so on.
 
NOTE: As I ended up making two extra envelope books, these are now for sale in my Etsy shop.
Related Posts Plugin for WordPress, Blogger...